Before You Buy: Compatibility Checklist (Don’t Skip This)
Use this checklist to avoid returns, rewiring headaches, and “it turns on but nothing works” problems.
1) Confirm your dashboard size (DIN)
-
Single-DIN: standard height, often smaller display
-
Double-DIN: larger touchscreen units, more features
Tip: Your car might physically fit Double-DIN but still require a dash kit for clean mounting.
2) Identify factory features you want to keep
-
Steering wheel controls
-
Factory amplifier / premium audio
-
Backup camera / parking sensors
-
Factory USB port
-
Satellite radio (if you use it)
3) Pick the right media player features (USA users care most about)
-
Wireless/USB Apple CarPlay and Android Auto
-
Bluetooth calling + audio streaming
-
Fast touchscreen response and bright display
-
Multiple audio outputs (RCA pre-outs) if you’ll add an amp
-
Reliable GPS (built-in or phone-based)
Tools and Materials You’ll Need
Essential Tools
-
Screwdrivers (Phillips + flathead)
-
Panel/trim removal tool (helps prevent scratches)
-
Wire stripper + crimp tool (or solder + heat shrink, if preferred)
-
Electrical tape / heat shrink tubing
-
Zip ties (wire management)
-
Multimeter (optional but helpful for diagnosing power)
Must-have Parts (recommended for most cars)
-
Wiring harness adapter (vehicle-specific)
-
Dash kit (for proper fit and clean edges)
-
Antenna adapter (if needed for radio reception)
-
Optional: steering wheel control module, camera retention adapter
Why these matter: A harness adapter helps you avoid cutting factory wiring and reduces error risk. A dash kit makes the unit look factory-fit instead of “floating.”
Step-by-Step: How to Install a Car Media Player
Safety note: This guide is for general guidance. Vehicle trims vary. If your vehicle has complex electronics, consult a pro installer.
Step 1: Save settings and prepare
-
Park safely, turn off the car, remove the key.
-
If your old stereo has presets you care about, note them.
Step 2: Disconnect the battery (important)
-
Open the hood and disconnect the negative battery terminal first.
-
Keep the cable away from the terminal to prevent accidental contact.
Step 3: Remove the trim and old head unit
-
Carefully remove the dash trim using a panel removal tool.
-
Remove mounting screws and slide the old unit out.
-
Unplug the wiring harness and antenna cable.
Step 4: Install the dash kit and mounting brackets
-
Attach brackets to the new media player if required.
-
Test-fit the dash kit so everything sits flush.
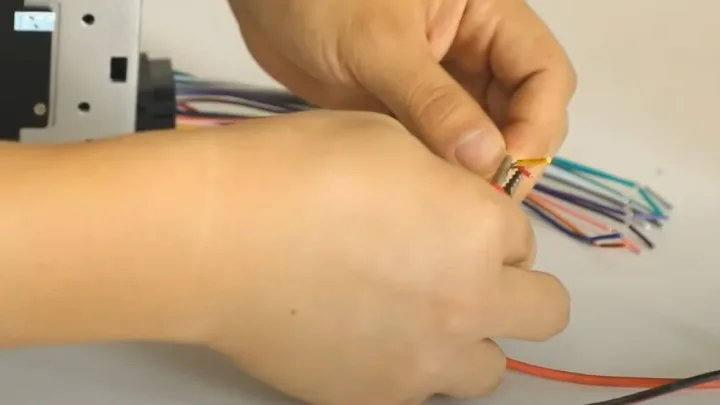
Step 5: Connect wiring (clean + reliable)
Most head units connect through a harness with color-coded wires. The safest path:
-
Connect the vehicle harness adapter to your car’s factory connector.
-
Connect the adapter to your media player harness (often plug-and-play, or via matched wiring).
Typical wire roles (varies by brand):
-
Yellow: constant power
-
Red: accessory / ignition power
-
Black: ground
-
Speaker pairs: front/rear channels (color-coded)
Best practice: Make connections secure and insulated. Loose connections cause intermittent power, popping sounds, or random resets.
Step 6: Connect antenna + optional modules
-
Plug the antenna (or antenna adapter) into the new unit.
-
If you’re keeping steering wheel controls or a factory camera, connect the retention modules now.
Step 7: Quick test before reassembly (saves huge time)
Reconnect the battery temporarily and test:
-
Powers on correctly
-
Audio works on all speakers
-
Radio reception is acceptable
-
Bluetooth pairs and plays audio
-
CarPlay/Android Auto works (USB or wireless)
-
Backup camera view appears when in reverse (if applicable)
Step 8: Secure the unit and reassemble
-
Turn car off again, disconnect battery if needed for final wire management.
-
Tuck wires neatly (don’t pinch cables).
-
Screw the unit into place, reinstall trim, reconnect battery fully.
Testing Checklist (AEO-friendly)
Use this quick checklist after installation:
✅ Power: boots reliably, no random restarts
✅ Audio: sound from all speakers, balance/fade works
✅ Radio: stations tune clearly, antenna connected properly
✅ Bluetooth: connects, call mic works, no laggy audio
✅ Phone integration: CarPlay/Android Auto loads correctly
✅ Display: brightness, touch, and buttons respond correctly
Troubleshooting Common Issues (Expanded for 2026)
Problem: No power
Likely causes
-
Loose accessory/constant power connection
-
Blown fuse (vehicle or head unit)
-
Ground not secured
What to do
-
Check fuses first
-
Confirm harness is fully seated
-
Verify the ground connection is solid
Problem: Powers on but no sound
Likely causes
-
Factory amp integration issue
-
Speaker wires not connected correctly
-
Wrong adapter for premium sound systems
What to do
-
Check if your car has a factory amp and needs an amp interface
-
Confirm speaker connections and settings
-
Ensure “mute”/“ATT” settings aren’t enabled
Problem: Only some speakers work
Likely causes
-
Incorrect speaker wire pairing
-
Fader/balance settings
-
Factory amp channel mapping
What to do
-
Reset audio settings to default
-
Recheck speaker wire connections
Problem: Buzzing/whining noise (engine-related)
Likely causes
-
Ground loop or poor grounding
-
RCA routing too close to power wiring
What to do
-
Improve ground point
-
Separate signal and power wiring paths
Problem: Weak radio reception
Likely causes
-
Missing antenna adapter
-
Antenna amplifier not powered (common in some vehicles)
What to do
-
Use the proper antenna adapter
-
Verify any required antenna power lead is connected
Problem: Bluetooth connects but no audio
Likely causes
-
Wrong audio source selected
-
Phone volume or media output not set correctly
What to do
-
Select Bluetooth audio as the source
-
Forget device and re-pair
-
Check phone’s media output routing
Pro Tips to Avoid Mistakes (Adsense-friendly value section)
-
Use a vehicle-specific harness adapter instead of cutting factory wires.
-
Test everything before reinstalling the trim.
-
If you have a premium factory audio system, plan for amp integration.
-
Don’t force trim panels; clips break easily and cause rattles.
-
Keep wires tidy with zip ties to prevent future vibration noise.
Frequently Asked Questions (FAQ)
Do I need a wiring harness adapter to install a car media player?
In most cases, yes. A vehicle-specific harness adapter reduces wiring errors and helps avoid cutting factory wiring.
What’s the difference between Single-DIN and Double-DIN?
Single-DIN is a smaller standard stereo size. Double-DIN is taller and usually supports larger touchscreens and more features.
Can I keep steering wheel controls after installing a new media player?
Usually yes, but you may need a steering wheel control module that matches your vehicle and head unit brand.
Why does my head unit turn on but there’s no sound?
Common causes include factory amp integration issues, incorrect wiring, or missing amp interface adapters for premium sound systems.
Will installing a media player drain my car battery?
Not normally if wired correctly. Battery drain can happen if constant power and accessory wiring are incorrect.
Can I add a USB port to an older car stereo setup?
Yes. Many head units include USB inputs, and a USB extension cable can make access easier.
How long does a typical installation take?
Most basic installs take 1–3 hours. Cars with factory amps, cameras, or complex trim may take longer.
Do I need professional installation?
If your car has premium audio, advanced electronics, or you want factory features retained perfectly, professional installation is recommended.
Disclosure
Some links may be affiliate links. That means we may earn a small commission at no extra cost to you.